FluentConfigurationException: An invalid or Incomplete Configuration was used while creating Session Factory

I got this exception when I tried to run my Repository tests and couldn’t find the exact reason why these tests failed.

All the unit tests where passing before I removed the default constructors from Domain Model, when I reverted the default constructors back, everything started working again….. !!!

Do you know the exact reason for this?

Update: In order to support lazy loading, NHibernate needs to create proxy objects. Those proxy classes derived from the actual domain model class itself, and they are instantiated using the default constructor. So the parent class also should have a default constructor.
Comet a.k.a Server Pushing

Have you ever thought about how chatting in Gmail works? I think it works using a programming technique called Comet.

What is comet programming

In web development, Comet is a neologism to describe a web application model in which a long-held HTTP request allows a web server to push data to a browser, without the browser explicitly requesting it. Comet is an umbrella term for multiple techniques for achieving this interaction. All these methods rely on features included by default in browsers, such as JavaScript, rather than on non-default plugins

Wikipedia

Last few days, I was reading about this technology and thought about sharing the information with you all. Please find the attached sample application which demonstrates how comet works using Asp.Net (Note: Right now it works only in firefox. Fixes or patches to make it work in IE/Safari.. or all the browsers in this world are welcome J )

Please download the demo from here

Tip for Writing Better NUnit Test Cases

If you have method, which does the string reverse. So normally we writes test cases in Nunit something like this

1
2
3
4
5
6
7
8
9
10
11
12
13
[Test]
public void TestCase1()
{
ExString exString = new ExString();
Assert.AreEqual("dcba", exString.Reverse("abcd"));
}

[Test]
public void TestCase2()
{
ExString exString = new ExString();
Assert.AreEqual("abba", exString.Reverse("abba"));
}

This means, you are repeating the same code again and again in order to test different possibilities. The down side of this approach is, in long run it will be very difficult to manage the test case when compared to the actual code.

To solve this particular problem NUnit has got parameterised test cases attribute, so the same could be re write above test case to

1
2
3
4
5
6
7
8
9
[TestCase("abcd", "dcba", TestName = "Test Case 1")]
[TestCase("abcd1", "1dcba", TestName = "Test Case 2")]
[TestCase("aaaa", "aaaa", TestName = "Test Case 3")]
[TestCase("abba", "abba", TestName = "Test Case 4")]
public void Can_Reverse_A_Text(string actual, string expected)
{
ExString exString = new ExString();
Assert.AreEqual(expected, exString.Reverse(actual));
}

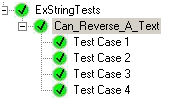
This gives a clean way for testing different possibilities, all these shown in the NUnit test runner as different test cases like below.

NUnit Screenshot

Hope this will help in some way or other

Inline Editing Using JQuery

Here I wanted to show you the flexibility of JQuery. Below is a HTML code that generates a grid with two rows and ten columns.

1
2
3
4
5
6
7
8
9
10
11
12
<div id="container">
<div class="column">1</div>
<div class="column">2</div>
<div class="column">3</div>
<div class="column">4</div>
<div class="column">5</div>
<div class="column">6</div>
<div class="column">7</div>
<div class="column">8</div>
<div class="column">9</div>
<div class="column">10</div>
</div>

When the user double clicks on any of the cell, he can edit that content. The cell value get updated when user double clicks on any other cell.

1
2
3
4
5
6
7
8
9
10
11
12
13
14
15
16
17
18
19
20
21
22
23
24
25
26
27
28
$(document).ready(function() {
$("#container .column").dblclick(function() {

var content = $(this).text();
var width = $(this).width() - 1;
var height = $(this).height() - 4;

var $editbox = $("<input type='text'" +
"style='width:" + width + ";" +
"height:" + height + ";" +
"border:none" +
"' value='" + content + "' />");

$(this).empty();
$(this).prepend($editbox);
$editbox.focus();
$editbox.select();

$($editbox).bind("blur", function() {

content = $(this).val();
var parent = $(this).parent();
parent.html(content);

});

});
});

The above code does all the trick. First we hook the Double Click event to all the DIV with class name column using this $("#container .column").dblclick(function(){...}); Inside that, we dynamically add a textbox inside the DIV and set its text value as the HTML content of the parent DIV. And also we bind the blur event of this texbox to a function, so that whenever the focus leaves from the textbox, that function is called. Then inside that function, we set the HTML content of the DIV with the Textbox value.

1
2
3
4
5
6
$($editbox).bind("blur", function() {
content = $(this).val();
var parent = $(this).parent();
parent.html(content);

});

See the working demo below

Code Generation - Easy Way

Recently I read about Text Template Transformation Toolkit(T4), I was really amazed by this because I thought only CodeDOM was the only way to generate code.

T4 is a template based code generation engine which comes with Visual Studio 2008 (It is not a framework feature).

This simple example shows how powerful it is -

if you have a string array and you want to generate a strongly typed enum from this.

###Steps

1) Open up VS 2008 and Create a project.
2) Add a file called “EnumGenerator.tt” to the project. Accept the warning when add this file. Paste these code into the file you have created right now.

1
2
3
4
5
6
7
8
9
10
11
12
13
14
15
16
17
18
19
20
21
22
23
<#@ template language="C#" hostspecific="True" debug="True" #>
<#@ output extension="cs" #>
<#
string[] values = new string[]{"Red","Green","Blue"};
#>

namespace TextTemplate {
<#
PushIndent("\t");
#>
enum Color {
<#
for(int i = 0; i < values.Length; i++)
{
PushIndent("\t");
WriteLine(values[i] + ((i != values.Length -1) ? "," : ""));
PopIndent();
}
#>
}
<#
PopIndent();
#>

3) Done! Click the plus sign near the EnumGenerator.tt, you can see the source code.

The beauty of this technique is, it is not runtime or compile time. The code is generated at design time which allow you to use this enum(or whatever code you have generated) at the same time you write your code.

To learn more about this, here is the great link - http://www.olegsych.com/2007/12/text-template-transformation-toolkit/

XUL - Create Cross Platform Application with Ease

You want to create simple GUI cross platform application without knowing the high level programming languages like C++, Java, C#~(using mono)? XUL is that answer.

Yes it is possible using XUL, the prerequisites for this is, knowledge of a declarative programming language(like HTML or XHTML, XAML etc…) and JavaScript.

XUL is basic building block of the Firefox UI and as we know Firefox works in Windows, Linux and MAC.

Actually XUL is a language which run on the XULRunner(Gecko) runtime from Mozilla.

If you really wants see how Firefox created this UI, go the FireFox installation folder. Normally it will be C:\Program Files\Mozilla Firefox\. Under that installation root folder, find a folder named “chrome”. Firefox has packaged the xul files in a zip format and they have renamed it as .jar. So look for a file browser.jar and rename it to zip. Extract it and have a look at content\browser\browser.xul. This file holds the UI definition for Firefox.

To learn more about XUL, refer these web sites

  1. http://www.mozilla.org/projects/xul/
  2. http://www.ibm.com/developerworks/web/library/wa-xul1/