SQL Injection Attack Detection Tool

Today I found a tool called Scrawlr that will help you to detect SQL injection loop holes in your web application. I hope it will be a good add-on to your archery against security attacks.

For those who don’t know what is SQL injection –

SQL injection is a technique that exploits a security vulnerability occurring in the database layer of an application. The vulnerability is present when user input is either incorrectly filtered for string literal escape characters embedded in SQL statements or user input is not strongly typed and thereby unexpectedly executed. It is in fact an instance of a more > general class of vulnerabilities that can occur whenever one programming or scripting language is embedded inside another.

Get more details about Scrawlr from this blog post

How Web Servers Identify Your Session?

I think, you have all created session variables inside an asp.net application. Then how the web server knows you are the same guy created that session when successive request goes to the server.

Before explain this, we have to think that every request that we sent from a web browser is considered as a new request by the IIS. This is the behavior of every web application i.e. the state less nature. For example if you open a url, first the browser sent a request for the default document. Then the browser parses the HTML response and it sends another set of requests based on the required images, scripts that are included in that page.

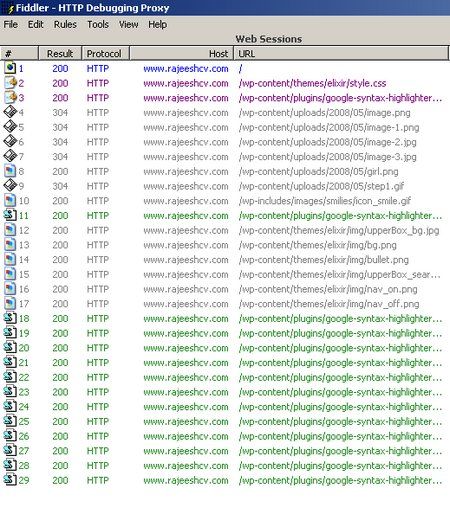
Below you could see, the different requests that sent by my browser when I opened my blog

Fiddler Trace

Some think State less nature is the biggest drawback of a web application, but in my view this is an advantage because you could distribute your application as you like, because it is not tightly coupled to a particular request.

Developing State aware application is one of the main challenge involved in any web development. For developing a State aware application, you don’t need to do much. All most all server side scripting languages supports creation of Session variables. Session variables are created in the memory location where your web server runs and it is created per user basis. That means, User1 creates a session variable but User2 can’t modify that particular session variable, he can only work with the session variables he created. Ok thats about session, but how your server identify this users?

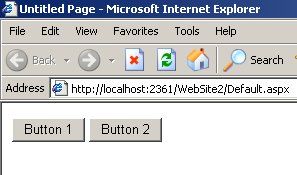
I will explain that with an example, for that I have created a simple website with one page and I have placed two buttons in that page. When user click on the Button1, a session variable is set. If the user click on the Buttton2, the value from session variable is written back on the page using Response.Write(..) method.

Test Page

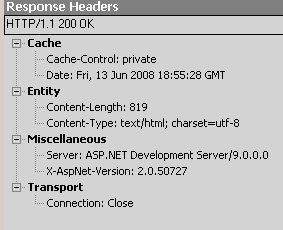
When I first hit this url, the HTTP headers of request and response looks like below

First request headers

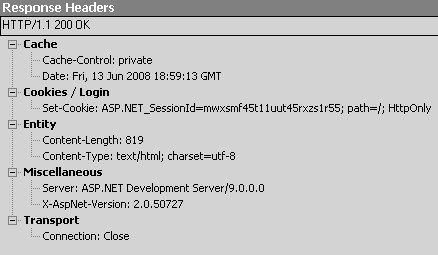
First response header

This request simply means, we are looking for a Default.aspx page and the web server is returning that page. Ok. Now we click on Button 1, at that time if you look at the HTTP request header

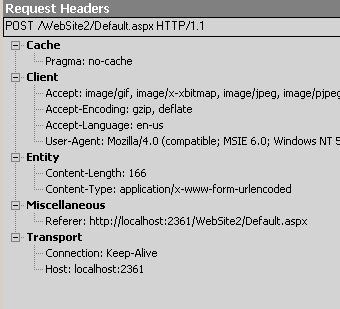
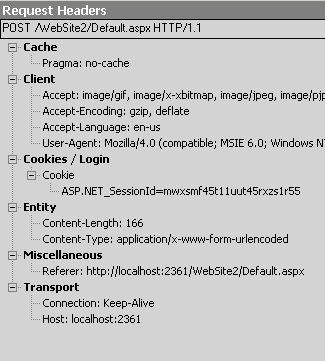
Button1 click request headers

From that header you could understand that, it is a simple form post header. As I said earlier, we are setting a session variable. Because of that, your server will create id for identifying your session and that value is send back as a cookie to browser through response header. Below is the response header of Button 1 click

Button1 click response headers

In that response, you could see a Set-Cookie header with cookie name AS.NET_SessionId with some value is sent back to the browser. From now onwards, each an every request send from that page will have this cookie value. To show that, we click on the Button 1 again, see below is the request header for that

Button1 click second time request headers

There your browser passes the AS.NET_SessionId cookie value to the server through each and every request. With this cookie value only your server identify the sessions, Hope you have got some idea about this.

Here I have used Fiddler as the tool for intercepting these request/response.
If you need this tool please goto http://www.telerik.com/fiddler and download it.

Creating a Custom Silverlight Control

In this post, I will explain how to create a custom control in silverlight. The control we create is a simple control which will draw a circle, the radius of the circle is controlled through the exposed public property.

This is a simple control, but hope this will give you an idea about the approach to the custom control development in silverlight.

Create a the Silverlight class library project first
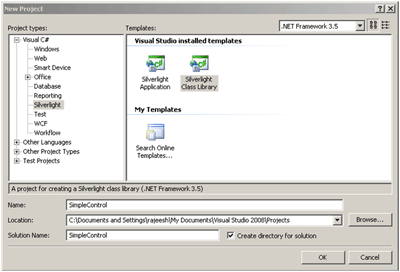
New Project Dialog

I have named the solution and project as SimpleControl, after the class library is created, you will get a default class Class1.cs delete that file. We don’t need that one; we will be creating a new one later.
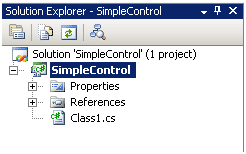
Source TreeView

Add a new text file to the project and give it’s name HostingSurface.xaml
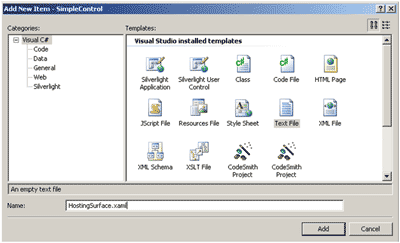
New File Dialog

This xaml file is the root canvas for our control. After completing this, you have change the build action for this xaml file. Change the build action to Embedded Resource
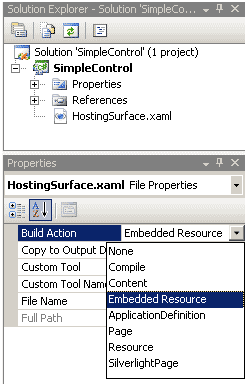
Change Build Action

Now we will, create the canvas using the xaml code…

Xaml View

Inside this canvas, we will place the circle element that we are going to create. Next, we need to create a class that will, does the actual rendering logic. For that, create a class called HostingSurface.xaml.cs
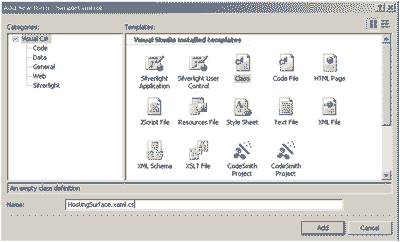
Code behind file

Derive that class from the base “Control” class and we need two variables hostingCanvas and circle. hostingCanvas will point to the root canvas we created in the xaml file. And the circle variable, will hold the actual Ellipse element. We have created a public property Radius which will control the radius of our circle. We will implement this later. Now, we need to load the xaml file and need to initialize the hostingCanvas variable. For that we use the InitializeXaml(…) function.

HostingSurface class

Since, we want to separate the rendering xaml from the code, for that purpose we are going to add a xaml file called SimpleCircle.xaml into the project. Otherwise, you can hardcode this string value in the class file itself, doing that will make the code unmanageable. Mark this xaml file as embedded resource.

Then create an Ellipse element. Here we have created an Ellipse element with Width and Height 100 pixels and filled it with the red color.

SimpleCircle xaml

We want this file to be loaded, for that go to the HostingSurface.xaml.cs file and read the embedded SimpleCircle.xaml file and convert into a Ellipse element. Here we have used XamlReader.Load(…) method to do this. After the circle variable is initialized, we add that element to the root canvas of our control (“hostingCanvas”).
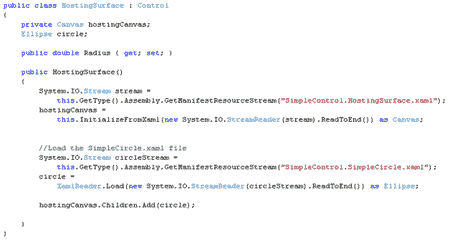
Loading SimpleCircle xaml

Now, we have the circle element. And we have to update the Width and Height when the value of Radius is set.
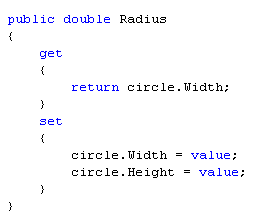
Radius property

And we have completed the simple control. For testing this we need a Silverlight Application project. So create a silverlight application project and add that to our solution. Use the “Generate an HTML test page” option while creating this project.
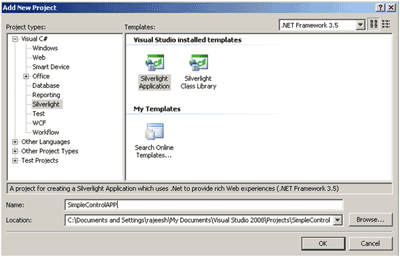
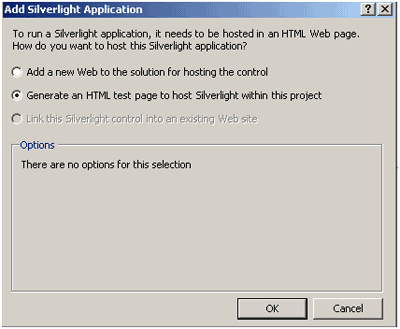
New silverlight Application

Silverlight Application Wizard

Add the SimpletControl reference to the newly created siliverlight application project.

Project Reference

You need to add, the namespace in the Page.xaml, like this xmlns:Simple="clr-namespace:SimpleControl;assembly=SimpleControl and add our new control also to the page.xaml

SimpleControl in test page

Now run the application, you can see a red circle inside a black rectangle. Hope you all got some fair idea about the custom control development in silverlight. I have included complete screen shot, to just make sure everyone understand the flow.

You can download the complete source code from here